Setting up an SSH proxy with PuTTY#
Warning
If you simply want to configure PuTTY to connect to login nodes of the VSC clusters, this is not the page you are looking for. Please check out how to configure PuTTY.
Rationale#
ssh provides a safe way of connecting to a computer, encrypting traffic and avoiding passing passwords across public networks where your traffic might be intercepted by someone else. Yet making a server accessible from all over the world makes that server very vulnerable. Therefore servers are often put behind a firewall, another computer or device that filters traffic coming from the internet.
In the VSC, all clusters are behind a firewall, but for the tier-1 cluster muk this firewall is a bit more restrictive than for other clusters. Muk can only be approached from certain other computers in the VSC network, and only via the internal VSC network and not from the public network. To avoid having to log on twice, first to another login node in the VSC network and then from there on to Muk, one can set up a so-called ssh proxy. You then connect through another computer (the proxy server) to the computer that you really want to connect to.
This all sounds quite complicated, but once things are configured properly it is really simple to log on to the host.
Setting up a proxy in PuTTY#
Warning
In the screenshots, we show the proxy setup for user vscXXXXX to
the login.muk.gent.vsc login node for the muk cluster at UGent
via the login node vsc.login.node.
You will have to
replace
vscXXXXXwith your own VSC account, andreplace
login.muk.gent.vscby the node that is behind a a firewall that you want to acces, andfind the name of the login node for the cluster you want to use use as a proxy in the sections of the local VSC clusters, and replace
vsc.login.nodeaccordingly.
Setting up the connection in PuTTY is a bit more complicated than for a simple direct connection to a login node.
First you need to start up pageant and load your private key into it. See the instructions on our “Using Pageant” page.
In PuTTY, go first to the \”Proxy" category (under \”Connection"). In the Proxy tab sheet, you need to fill in the following information:
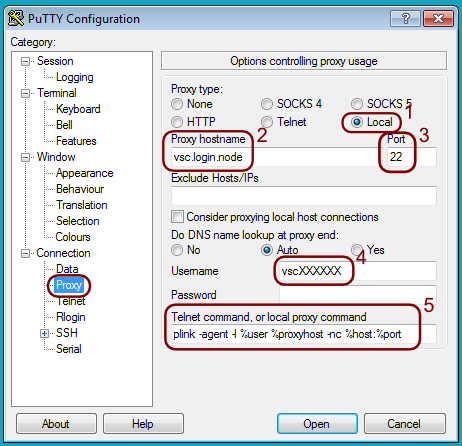
Select the proxy type: “Local”
Give the name of the “proxy server". This is vsc.login.node, your usual VSC login node, and not the computer on which you want to log on and work.
Make sure that the “Port” number is 22.
Enter your VSC-id in the “Username” field.
In the “Telnet command, or local proxy command", enter the string
plink -agent -l %user %proxyhost -nc %host:%port
Note
“plink” (PuTTY Link) is a Windows program and comes with the full PuTTY suite of applications. It is the command line version of PuTTY. In case you’ve only installed the executables putty.exe and pageant.exe, you’ll need to download plink.exe also from* the PuTTY web site We strongly advise to simply install the whole PuTTY-suite of applications using the installer provided on the PuTTY download site.
Now go to the “Data” category in PuTTY, again under “Connection”.
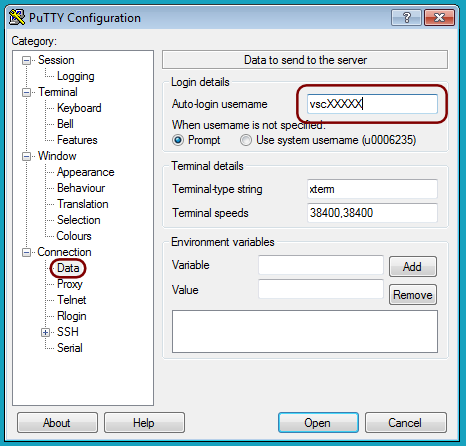
Fill in your VSC-id in the “Auto-login username” field.
Leave the other values untouched (likely the values in the screen dump)
Now go to the “Session category
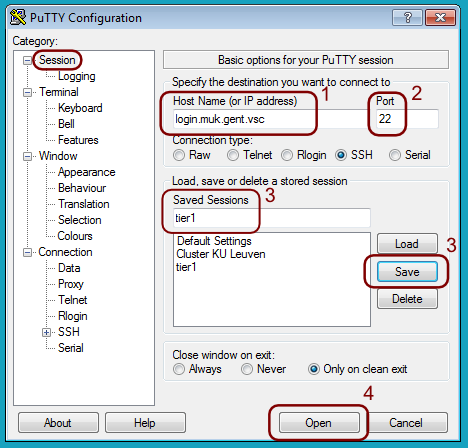
Set the field \”Host Name (or IP address) to the computer you want to log on to. If you are setting up a proxy connection to access a computer on the VSC network. you will have to use its name on the internal VSC network. E.g., for the login nodes of the tier-1 cluster Muk at UGent, this is login.muk.gent.vsc and for the cluster on which you can test applications for the Muk, this is gligar.gligar.gent.vsc.
Make sure that the “Port” number is 22.
Finally give the configuration a name in the field “Saved Sessions” and press “Save”. Then you won’t have to enter all the above information again.
And now you’re all set up to go. Press the “Open” button on the “Session” tab to open a terminal window.
For advanced users#
If you have an X-server on your Windows PC, you can also use X11 forwarding and run X11-applications on the host. All you need to do is click the box next to “Enable X11 forwarding” in the category “Connection” -> “SSH”-> “X11”.
What happens behind the scenes:
By specifying \”local" as the proxy type, you tell PuTTY to not use one of its own build-in ways of setting up a proxy, but to use the command that you specify in the \”Telnet command" of the \”Proxy" category.
In the command
plink -agent -l %user %proxyhost -nc %host:%port
%userwill be replaced by the userid you specify in the “Proxy” category screen, %proxyhost will be replaced by the host you specify in the “Proxy” category screen (vsc.login.node in the example), %host by the host you specified in the “Session” category (login.muk.gent.vsc in the example) and %port by the number you specified in the “Port” field of that screen (and this will typically be 22).The plink command will then set up a connection to
%proxyhostusing the userid %user. The-agentoption tells plink to use pageant for the credentials. And the -nc option tells plink to tell the SSH server on%proxyhostto further connect to%host:%port.